First Piece Evaluation Procedure
PURPOSE
:This document details a procedure for the General Electric Appliance business, it’s sites and suppliers. This procedure provides a uniform method of evaluating, documenting, dispositioning and submitting first piece samples, including component parts, sub-assemblies, major assemblies and in some cases tooling. This procedure also defines the major first piece submittal requirements including part, tool, and process measurements.
REFERENCE DOCUMENTS:
Part/Component Qualification Requirements - Saros # 973170002
First Piece Evaluation Procedure - Document No. 4.6.3.1.0.0, Purchasing Quality System Manual Located at: GEA EmployeeNet/Purchasing/Documents
REQUIREMENTS:
The successful first piece procedure is a milestone in the part qualification proccess. It provides information as to the ability of the tool or process to make a minimal number of parts (under specific or controlled conditions) that meet the drawing and specificaitons. With an approved first piece, the part or process may now start the extended process capability run to prove capability under varying conditions. See Saros # 9721800026 for the Process Capabilty Procedure.
A first piece part evaluation is required for:
- all new parts and subassemblies
- revisions to existing parts and subassemblies
- changes in material
- when the point of manufacture or subassembly changes (including a new supplier or sub-tier supplier)
- a significant manufacturing, supplier or sub-tier supplier process change occurs
(as determined by AQE, Site Quality, or PMQE)
- new tooling is made or existing tooling is modified or repaired
In addition to first piece part evaluation, the Company’s commitment to the "six sigma" quality level philosophy requires that additional evaluations are made to ensure conformance of tooling, equipment, and processes to the capability levels necessary to insure compliance on all parts and processes whenever CTQ (Critical-to-Quality) characteristics are specified. These additional measures include prior-to-shipment recording, and GEA review of, CTQ related tool measurements and equipment or process parameter controls that directly or indirectly influence final part or assembly characteristics. The determination of which CTQ related tool dimensions or process parameters to be checked in this prior-to-shipment review should be based on the team consensus. (Design Engineering, AME, AQE, and Site Quality) This document will only attempt to recommend and establish general guidelines for these additional measures.
SAMPLE REQUIREMENTS:
The BCN should show the first piece part requirements and the initiating engineer will decide how many pieces are required for dimension, lab and appearance checks. The numbers will obviously vary depending on the application, but the following is added to provide a minimal guideline.
The number of samples to be measured or appraised by category are given by the following table
:|
Evaluation Category |
Parts and Assemblies First Piece - and - Tooling / Process Measurement Requirements For Every Cavity On Every Mold, Die, or Fixture |
|||
|
Non - CTQ Parts and Assemblies (*) |
CTQ Parts and Assemblies (*) |
|||
|
Minimum |
Recommended |
Minimum |
Recommended |
|
|
Dimensional First Piece |
1 |
2 |
2 |
3 or more as Req’d by Quality Leader |
|
Laboratory First Piece |
1 |
2 |
2 |
3 or more as Req’d by Quality Leader |
|
Appearance First Piece |
1 |
2 |
2 |
3 or more as Req’d by Quality Leader |
|
Tool Supplier / Builder Tool Measurements |
As Required |
As Required |
All CTQ’s |
All CTQ’s and others as Required |
|
Equipment / Process Parameters |
As Required |
As Required |
Critical Parameters |
Critical Parameters |
*
A CTQ Part or Assembly is one which has at least (1) CTQ on the Part or Assembly Drawing
REQUIREMENTS: (cont.)
Site Quality for each business shall be the overall owner of the First Piece Inspection process and is responsible for using the process and assigning owners for each of the required process flow steps shown under "Responsibilities and Procedures for First Piece:".
Use First Piece Report form GEA 1134A-C Part 1 (Rev 1/95) and MABG 1134B-C Part 2 (Rev 7/90) or electronic equivalent.
CTQ dimensions, at a minimum, must be checked on all feasibility parts, design confirmation parts, (prototype and production), and all long lead tooling and equipment items previously released. A deviation is required on "C" dispositions of long lead tools. Status will be reported at T and P reviews (refer to Standing Instruction 900001 section 1 for T and P review instruction).
All part/component/material characteristics or specifications on the drawing must be measured or appraised from production tools (all cavities and multiple tools), equipment, etc. when initially submitted for first piece.
Each characteristic or specification measured/appraised must be evaluated to the Engineering Drawing requirements and a disposition code applied that clearly shows the first pieced characteristic/specification. In addition, all CTQ characteristics or specifications measured are to be clearly indicated on the first piece submittal by an upper case "CTQ" surrounded by brackets as in "(CTQ)".
First piece disposition codes are as follows:
A - Acceptable.
B - Acceptable, drawing and/or specification to be changed to new tolerance indicated.
C - Not acceptable, however parts may be used providing Deviation Procedure in SI900001, section 7 is followed. Correct and resubmit new parts.
D - Not acceptable, correct and resubmit.
P - Provisional (must not be a CTQ characteristic), approval on existing tooling (Engineering must provide new tolerance acceptance limits for P disposition dimensions on First Piece Request form). Item must be corrected when retooled.
Thereafter on resubmittals, at a minimum, the following characteristics need to be (re)inspected and a new dispositioned assigned:
- CTQ characteristics/specifications
- revised drawing characteristics/specifications
- non "A" or "B" dispositioned characteristics/specifications
- dimensions involved in tooling modification or repair
Before Pilot Run:
All parts/components must be first pieced (all measurements taken, lab work and appearance completed) from final production tools, processes and manufacturing locations.
All First Piece Reports must be dispositioned.
Ideally, all First Piece characteristics should have an "A" or "B" disposition.
Any "C" dispositions must be approved for use by a formal deviation. No "D" disposition parts shall be used. "P" dispositions should be used sparingly (if at all), and shall not be used on CTQ characteristics. Any "P" disposition shall indicate new drawing dimensions and/or tolerances.
First Piece status is reported at T5 and P3 reviews.
Before Production:
All parts/components must be first pieced (all measurements taken, lab work and appearance completed) from final production tools, processes and manufacturing locations.
All First Piece Reports must be dispositioned.
Ideally, all First Piece characteristics should have an "A" or "B" disposition.
Any "B" disposition must include a drawing change date no later than the long term capability date established in the Quality Plan by Site Quality/AQE/PMQE. Any "C" disposition must be approved for use by a formal deviation, with approved plans for correction including scheduled tooling changes. No "D" disposition parts shall be used. "P" dispositions should be used sparingly (if at all), and shall not be used on CTQ characteristics. Any "P" disposition shall indicate new drawing dimensions and/or tolerances.
First Piece status is reported at T6 and P4 reviews.
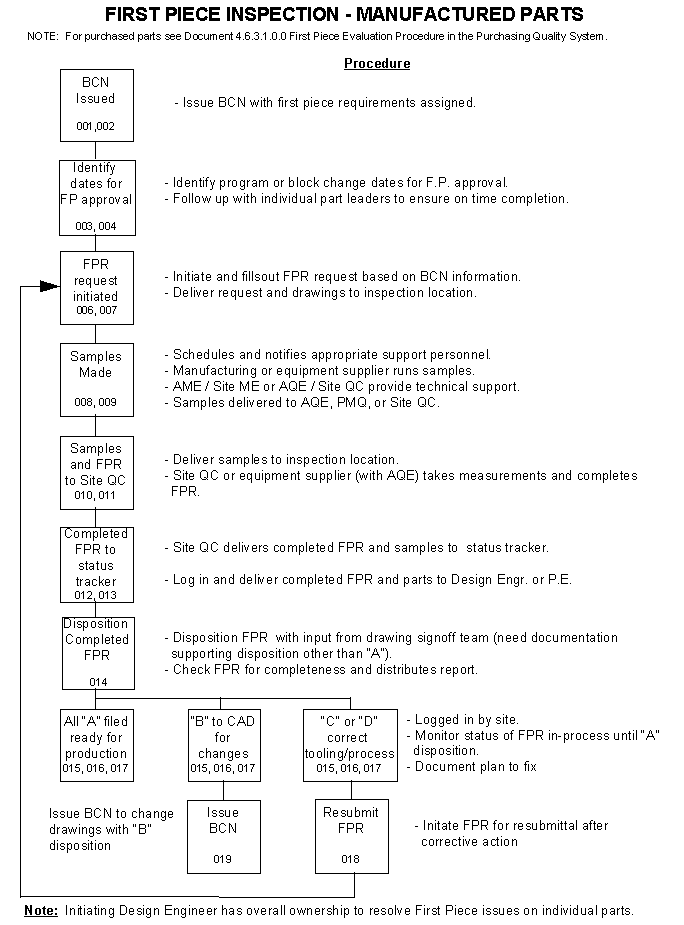
RESPONSIBILITIES AND PROCEDURES FLOWCHART

RESPONSIBILITIES AND PROCEDURES FOR FIRST PIECE:
Refer to Table 1 and the First Piece Process Flowchart for specific steps and responsibilities.
Table 1 - Steps 011 - 013
b. Process Capability included with the report.
c. Process Procedure included with the report.
d. Quality Planning included with the report.
Refer to the First Piece Process Flowchart
Issue a BCN to change the drawing to the new specifications. The BCN Number and Sheet Number used to process the "B" Disposition will be the same as the initial BCN but with an "F" suffix added to the Sheet Number.
Example : Initial BCN - - - BCN 2200012
Sheet No. 3
FPR BCN - - - BCN 2200012
Sheet No. 3F
The Site logs the dispositioned FPR for tracking purposes, files parts and distributes copies per the suggested distribution below (colors may vary at different sites).
White Original Site File
Blue Incoming File
Green Supplier
Yellow Initiating Engineer
Pink Purchasing completed copy
Yellow Purchasing original copy
The Program Manager (A / B Programs) or Site QC (C Programs) is responsible for reporting the status of the First Piece Activity on the parts/assemblies at Program and Technical Reviews.
RESPONSIBILITIES AND PROCEDURES FOR FIRST PIECE:
TABLE - 1
Specific process flow elements, roles and responsibilities to be assigned by Site Quality:
|
Step |
Procedure |
Responsibility * * Preferred organization. Site Quality will assign specific owners to each element of this defined process. |
|||
|
A and B Programs |
C Changes |
||||
|
Purchased Parts |
In-house parts |
Purchased Parts |
In-house parts |
||
|
001 |
Overall ownership for first piece process. |
Site QC |
Site QC |
Site QC |
Site QC |
|
002 |
Issue BCN with first piece requirements (including quantities). |
* Initiating Design Engineer |
* Initiating Design Engineer |
* Initiating Design Engineer |
* Initiating Design Engineer |
|
003 |
Identify program or block change due dates for first piece approval. |
Engineer Prog. Mgr. |
Engineer Prog. Mgr. |
* Initiating Design Engineer |
* Initiating Design Engineer |
|
004 |
Set and enforce FP requirements & schedule to ensure first piece completed on time and per NPI guidelines. |
Engineer Prog. Mgr. |
Engineer Prog. Mgr. |
* Initiating Design Engineer |
* Initiating Design Engineer |
|
005 |
Overall ownership to resolve First Piece issues on individual parts until "A" disposition. |
* Initiating Design Engineer |
* Initiating Design Engineer |
* Initiating Design Engineer |
* Initiating Design Engineer |
|
006 |
Initiate first piece report form using information on BCN. |
Purchasing |
AQE |
Purchasing |
Site QC |
|
007 |
Deliver first piece report form and drawings to inspection location or to supplier. |
Purchasing |
AQE |
Purchasing |
Site QC |
|
008 |
Schedule build of first piece samples. |
Supplier |
AME / Production Control |
Supplier |
Production Control |
|
009 |
Make first piece samples per BCN. |
Supplier |
AME / Manufacturing |
Supplier |
Manufacturing |
|
010 |
Deliver samples to inspection location. |
Supplier |
AQE
|
Supplier |
Site QC |
|
011 |
Complete measurements, record onto first piece report and identify CTQ’s on report. |
Supplier |
Site QC / AQE |
Supplier |
Site QC |
|
012 |
Review FPR for accuracy and completion and deliver completed First Piece Report and samples to site. |
Purchasing |
Site QC / AQE |
Purchasing |
Site QC |
|
013 |
Site logs in and delivers completed First Piece Report and samples to be dispositioned. |
Site QC |
Site QC |
Site QC |
Site QC |
|
014 |
FPR Dispositioned. (If other than "A" disposition, engineer assembles drawing sign-off team to evaluate options and determine corrective action) Deviation must be written for any "C" disposition. |
* Initiating Design Engineer |
* Initiating Design Engineer |
* Initiating Design Engineer |
* Initiating Design Engineer |
|
015 |
Initiate and document plan to fix non "A" or "B" dispositions. |
PMQE |
AME |
PMQE |
Site ME |
|
016 |
Track status of dispositioned First Piece Reports, distribute copies and file parts. |
Site QC |
Site QC |
Site QC |
Site QC |
|
017
|
Report status of First Piece on parts/assemblies at Program and Technical reviews. (See step 5) |
Engineer Prog. Mgr. |
Engineer Prog. Mgr. |
Site QC |
Site QC |
|
018 |
Initiate first piece report resubmittals for "C" or "D" dispositions. (Return to step 005) |
Purchasing |
AQE |
Purchasing |
Site QC |
|
019 |
Issue BCN to change drawings for "B" dispositions. |
* Initiating Design Engineer |
* Initiating Design Engineer |
* Initiating Design Engineer |
* Initiating Design Engineer |
*
If initiated from Technology: Design Engineer. If initiated from Manufacturing: Production EngineerRESPONSIBILITIES AND PROCEDURES FORM FOR FIRST PIECE:
The following form can be used as required to document the individuals responsible for each step in the process for any or all parts. Refer to Table - 1 on the prior page for suggested responsibilities. It also may be advisable to log the date received at each step by the individual for tracking purposes.
Sample Form - 1
|
Step |
Part Name |
Responsibility Site Quality will assign specific owners to each element of this defined process. |
|
Name Received Date |
||
|
001 |
Overall ownership for first piece process. |
|
|
002 |
Issue BCN with first piece requirements (including quantities). |
|
|
003 |
Identify program or block change due dates for first piece approval. |
|
|
004 |
Set and enforce FP requirements & schedule to ensure first piece completed on time and per NPI guidelines. |
|
|
005 |
Overall ownership to resolve First Piece issues on individual parts until "A" disposition. |
|
|
006 |
Initiate first piece report form using information on BCN. |
|
|
007 |
Deliver first piece report form and drawings to inspection location or to supplier. |
|
|
008 |
Schedule build of first piece samples. |
|
|
009 |
Make first piece samples per BCN. |
|
|
010 |
Deliver samples to inspection location. |
|
|
011 |
Complete measurements, record onto first piece report and identify CTQ’s on report. |
|
|
012 |
Review FPR for accuracy and completion and deliver completed First Piece Report and samples to site. |
|
|
013 |
Site logs in and delivers completed First Piece Report and samples to be dispositioned. |
|
|
014 |
Disposition FPR Deviation must be written for any "C" disposition. |
|
|
015 |
Initiate and document plan to fix non "A" or "B" dispositions. |
|
|
016 |
Track status of dispositioned First Piece Reports, distribute copies and file parts. |
|
|
017 |
Report status of First Piece on parts/assemblies at Program and Technical reviews. (See step 5) |
|
|
018 |
Initiate first piece report resubmittals for "C" or "D" dispositions. (Return to step 005) |
|
|
019 |
Issue BCN to change drawings for "B" dispositions. |
|
FIRST PIECE REPORT COMPLETION
For All Parts and Assemblies A/B/C Programs
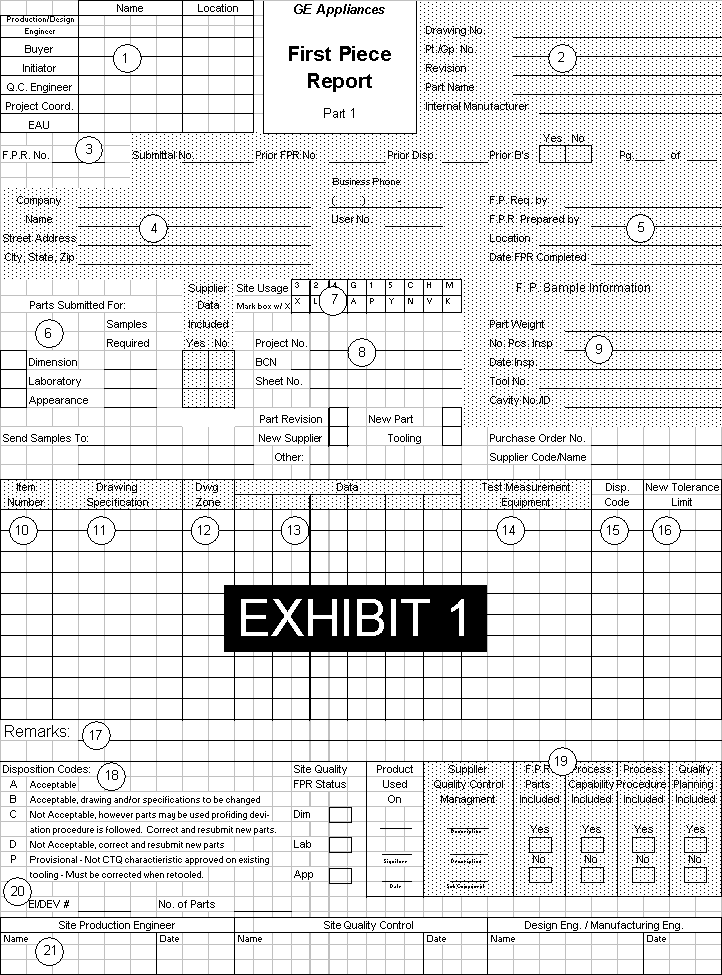
FPR Initiation: Site QC / AQE / PMQE is responsible for filling in the following sections in the attached document Exhibit 1. (Follow the "Numbered Circles" on Exhibit 1).
1 a. Production / Design Engineer
b. Buyer
c. Initiator
d. QC Engineer
e. Project Coordinator
f. EAU (estimated annual usage)
2 a. Drawing Number (For Parts Being First Piece Evaluated)
b. Part / Group Number
c. Revision
d. Part Name
e. Internal Manufacturer
3 a. First Piece Report No.
b. Submittal Number
c. Prior First Piece Report No.
d. Prior Disposition
4 For Purchased Parts and assemblies: The Buyer (or site designate) will provide the following information along with the purchase order.
a. Company
b. Name
c. Street Address
d. City, State, and Zip Code
e. Business Phone Number
f. User No. (If applicable)
6 a. Parts Submitted For: Check Blocks
Dimension [ ]
Laboratory [ ]
Appearance [ ]
b. Samples Required - Indicate number of samples for each item above
c. Send Samples To: Name and Location (For GEA location include Building and Dock No.
FPR Initiation: (cont.)
7 Site Usage - Check the appropriate box where the part(s) will be used. The code is as follows:
Code Site
1 AP-5
2 AP-2
3 AP-1
4 AP-3
A Leiser
B MABE Refrigeration
C Bloomington
G LaFayette
L Chicago - Range
Y Decatur
Others as Required
Codes 5, H, M, X, D, P, N, V, K - Not used at this time
8 a. Project No.
b. BCN
c. Sheet No.
- Check Block
Part Revision [ ]
New Supplier [ ]
New Part [ ]
Tooling [ ]
Other ___________
Measurement Phase:
Inspector/Technician (or approved measuring house of supplier) completes the following Items: (Follow the "Numbered Circles" on Exhibit 1).
5 a. First Piece Report requested by - Name
b. First Piece Report prepared by - Name
c. Location - Where First Piece Activity is Taking Place
d. Date First Piece Report Completed
e. Page Number - Pg. _____ of ____
Measurement Phase: (cont.)
9 a. First Piece Sample Information
Part Weight ___________________________
Number of Pieces Inspected _______________
Date Inspected __________________________
Tool Number ___________________________
Cavity No./ID _____ ______________________
10 Item Number - all Part Parameters are to be numbered in sequence 1, 2, 3, etc.
11 Drawing Characteristic - The Specific Parameter to be checked. All CTQ’s to be identified as noted earlier.
12 DWG. Zone - The X, Y coordinates on the drawing of the specific parameter.
13 Data Recording, for up to six (6) parts, cavities or as required to be numbered as appropriate by First Piece Inspector/Technician.
14 Test Measurement Equipment - Define method used for measuring characteristic (e.g. CMM, verniers, calipers, etc.).
17 Remarks - As necessary, but pertaining to First Piece Activity Only.
19 Check Block(s) [ ] YES [ ] NO To indicate if supplier made parts have included the preliminary planning and data with the First Piece Report. There also is a section for the suppliers quality control department to initial and date the form indicating that they have reviewed and approved the data.
a. First Piece Parts included with report
b. Process Capability included with report
c. Process Procedure included with report
d. Quality Planning included with report
Disposition Phase:
The Design/Production Engineer Reviews the Report and completes the following items: (Follow the "Numbered Circles" on Exhibit D)
15 Disposition Code - A, B, C, D or P per Block 17 for each item listed.
16 New Tolerance Limit - As required per each item listed.
17 Remarks - As necessary but pertaining to First Piece activity only.
20 If "C" disposition, indicate deviation number and number of parts for which deviation is valid.
21 Name(s) and Date(s) in the Sign off block indicated if A/B/C Program or in the Site Production Engineering Space if "C" Program.
Quality Review Phase:
AQE/Site QC will review the Report and complete the following Items:
(Follow the "Numbered Circles" on Exhibit D)
18 Review the Disposition Code for each Quality Characteristic evaluated and assign the lowest level Disposition Code (A, B, C, D or P) by checking the appropriate block in area 18 . Add the FPR Sheet Number when "B" Disposition. The FPR Sheet Number is the same as in "Circle" 8 but with an ‘F’ suffix.
21 Upon concurrence with dispositions, provide name and date as indicated.
NOTE 1: For C Programs the Site Quality Control Engineer will review the Report, if necessary, coordinate the results with AQE / Site ME or PIE and then sign the report in the space provided - Site Quality Control.
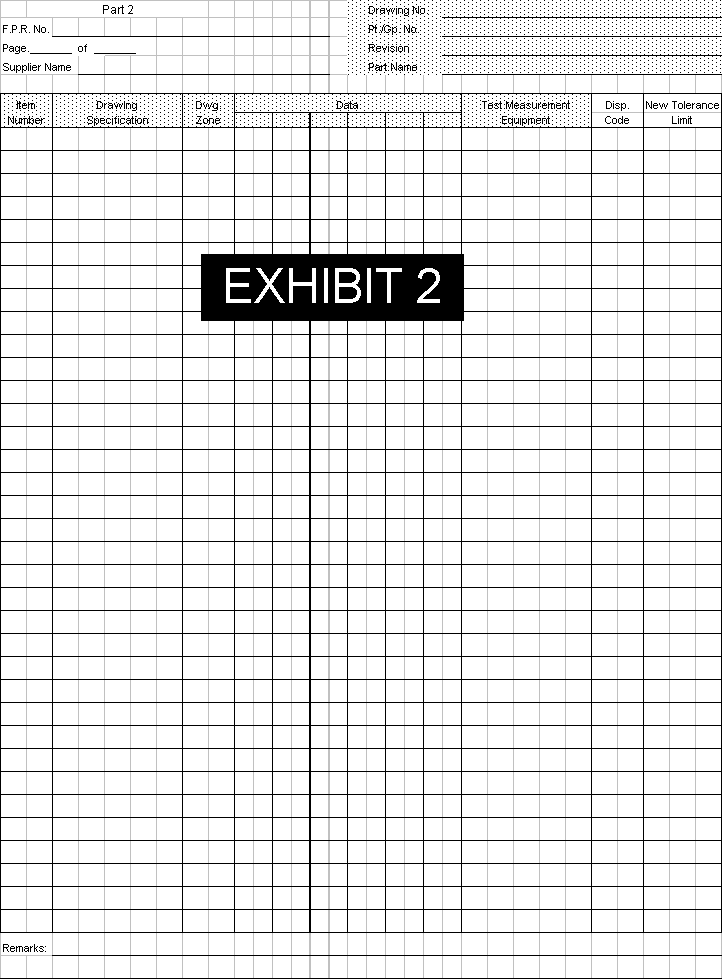
NOTE 2: Exhibit 2 is a data recording sheet, First Piece Report - Part 2, to be utilized with Exhibit 1, First Piece Report - Part 1, when the need arises.
NOTE 3: When First Piece Reports are received from another source and the First piece Evaluation results are to be repeated (duplicated or audited) it is obvious that a separate First Piece Report be generated. It is the responsibility of the Site performing this type of effort to maintain control of the original and duplicate First Piece Reports.
DEFINITIONS:
BUYER - GEA Purchasing function
PROCESS CAPABILITY - A predetermined methodolgy of sampling representative data from a new or existing process that determines the ability of the process to repeatedly meet the drawing specifications.
PROGRAM CLASS (A/B/C)
The program/project will be assigned a risk value of A, B, or C in accordance with the following matrix. Refer to Standing Instruction SI 900001 for detailed instructions on the NPI process.
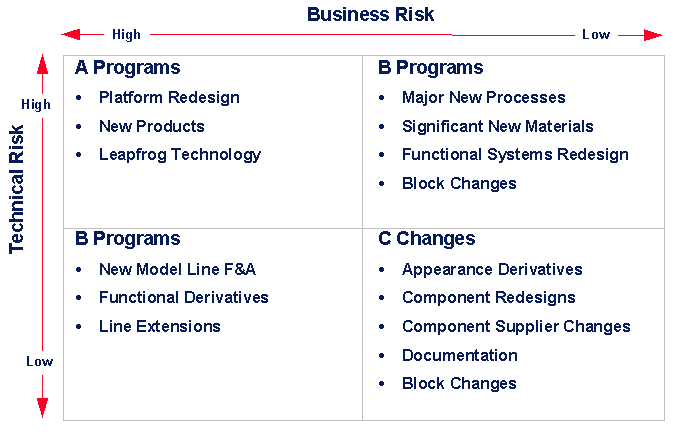
A specific group of "C" level changes planned for implementation in a common time frame are called a Block change. A Block change may be evaluated as a "B" or "C" level risk and will be reviewed accordingly. "C" level risk programs will be further broken down into C-1, C-2, C-3 by site CIB (Change Implementation Board).
Endorsement from the Office of Chief Engineer (OCE) must be obtained when determining a program risk category. The Senior Consulting Engineer (SCE) from the OCE will facilitate that endorsement.
QUALITY PLAN - A documented part/process plan that details the actions required to ensure that part or process conforms to the drawing and specification requirements. Such a plan would document items such as what are the CTQ’s, how they will be measured, who will measure them, how often they will be measured, etc.
SIX SIGMA - Six standard deviations between population nominal and specification limit
COMMON ACRONYMS:
AME - Advanced Manufacturing Engineer
AQE - Advanced Quality Engineer
BCN - Business Change Notice
BCR - Business Change Request
CCB - Change Control Board
CIB - Change Implementation Board
CTQ - Critical to Quality
DE - Design Engineer
EMPIS - Engineering Materials and Process Information Service
FPR - First Piece Report (GEA Form 1134A-C Part 1 and Part 2)
FQE - Field Quality Engineer
GD&T - Geometric Dimensioning and Tolerancing
IAS - International Approval Services (Formerly AGA)
ISO - Organization for International Standards
LSL - Lower Specification Limit
MCS - Material Coordination Specialist
NPI - New Product Introduction
OCE - Office of the Chief Engineer
OSHA - Occupational Safety and Health Administration
PCE - Process Control Engineer
PIE - Process Improvement Engineer
PMQE - Purchased Material Quality Engineer
PMQS - Purchased Material Quality Specialist
PPM - Parts per Million
PPM - Purchasing Program Manager
SC# - Source Code #
SPC - Statistical Process Control
UL - Underwriter’s Laboratory
USL - Upper Specification Limit
RESPONSIBILITY & AUTHORITY:
The Manager Advanced Quality Engineering has the responsibility for maintaining this document. The Site Quality Managers and Manager Supplier Quality has the responsibility for implementation.COUNSEL with regard to interpretation and implementation of this procedure will be provided by Manager Advanced Quality Engineering.
|
AUTHOR: |
Title: |
Advanced Quality Engineering |
Name: |
Steve Santo |
Date: |
4-18-97 |
|||
|
REQUIRED APPROVAL(S): |
APPROVAL SIGNATURE(S): |
||||||||
|
(Titles filled in by author) |
(Name/Date filled in by approver) |
||||||||
|
Title: |
Manager Quality Systems |
Name: |
William J. Harrity |
Date: |
5/1/97 |
||||
|
Title: |
Manager Engineering Support |
Name: |
Mark Larson |
Date: |
7/7/97 |
||||
|
Title: |
Manager Design Methods & Analysis |
Name: |
Ken Zagray |
Date: |
4-30-97 |
||||
|
Title: |
Manager Advanced Quality Engineering |
Name: |
Steven D. Santo |
Date: |
4-30-97 |
||||
|
Title: |
Manager Supplier Quality |
Name: |
fred walker |
Date: |
5/6/97 |
||||
|
Title: |
Quality Manager AP1 |
Name: |
Ralph G Millen |
Date: |
5/15/97 |
||||
|
Title: |
Quality Manager AP2 |
Name: |
Larry Thomas |
Date: |
5/15/97 |
||||
|
Title: |
Quality Manager AP3 |
Name: |
Robert C. Thesier |
Date: |
5/16/97 |
||||
|
Title: |
Quality Manager AP4/5 |
Name: |
Mark J. Evans |
Date: |
5/26/97 |
||||
|
Title: |
Quality Manager DPO |
Name: |
Bill Dobbs * |
Date: |
6/25/97 |
||||
|
Title: |
Quality Manager BPO |
Name: |
Darrin Davidson |
Date: |
6/12/97 |
||||
|
Title: |
Quality Manager Roper Corp. |
Name: |
Steve Patterson * |
Date: |
5/19/97 |
||||
|
Title: |
Quality Manager CPO |
Name: |
Evangelina G. Garza |
Date: |
6/16/97 |
||||
|
Title: |
Quality Manager LEISER |
Name: |
Agustin Soto * |
Date: |
6/17/97 |
||||
* Approval given by electronic message